Showing posts with label blog. Show all posts

Monday, July 7, 2014

Monday Made it!

Wow. What a weekend! Spent from Thursday to Sunday at the Lake, and I'm happy to say I have somewhat of a tan! Yay!

Here is a quick picture of my baby in his patriotic gear! This is the pallet I painted last week!
The 4th of July inspired my made it for this week!
 Now on to my Made its with Fourth Grade Frolics! Love this linky!
http://4thgradefrolics.blogspot.com/2014/07/monday-made-it-summer-week-6.html
 
Check out this adorable bowtie I made for his July 4th Outfit! I really got back into crocheting the last few weeks I was pregnant because I needed something to do! :) They are super easy to crochet!
 
 So I decided to make a few more for him to wear during the holidays! I've made 2 Halloween themed and one Christmas so far! (One of them is not done yet!) I love them!
 Last, I whipped up a holiday hat for Ryder for Christmas. I made lots of hats for his newborn photo shoot, but now he has grown out of them! There is a great pattern to make this from RepeatCrafterMe. Check it out there are tons of cute, free patterns!
 That's it for this week! Can't wait to find some more project on your Monday Made it!


Monday, August 19, 2013

First Days of School Whirlwind!

Wow! I can't believe these first 3 days of school. It has been crazy and exhausting trying to get back in the swing of things! It was so exciting to see all of my kids from last year walk through my door again. They are all SO tall, I feel short! Guess that's what happens when you teach 5th grade.

Here are some fun things we have done the last couple days of school.
 I saw this great GROUPS acronym to use in my classroom. I had my kids get in groups, OF COURSE, to create their own. I love how they turned out! Now, if we have any issues we can just look up at the board!
 Next, we worked on our Classroom Constitution. I pinned this cute idea that goes along with the book We the Kids by David Catrow . If you haven't read this it is great for social studies!
 My class loves to do art projects. So again, gotta love Pinterest. We each created our own hands and decorated them. Now we have a great, unique class wreath by our door!
I'm proud to say after 3 days my desk still looks like this! YES! It probably won't last much longer after I start getting papers to grade!


Sunday, August 11, 2013

Monday Made it August 12th

I can't believe it is Monday again! Back for my first full week of school! My kids start Thursday! Ah.. so much to do! But I love how this linky keeps me motivated! Click below to link up!


This last weekend we hosted my friend's bridal shower! So this has been a easy DIY go-to gift for brides! I have made it 3 times now! And the funny thing is they all had to same color of kitchen, green! Weird!

1. Gather materials. A frame, flower, a piece of scrapbook paper, and letter for their last name from Michael's. And a piece of kitchen tile from Home Depot! I went with a cheap neutral color for the tile.
2. Take out the glass from the frame, you don't need it.
3. Hot glue the scrapbook paper to the cardboard backing from the frame. Attach it to the frame. I put some hot glue on the back in each corner to hold it because there was a gap where the glass should be.
4. Then it's time to glue the tile to the paper. I had to use Wood Glue that I found in the garage because hot glue did not work!
5.  Next, glue your letter to the tile with the same wood glue.
6. Add your flower! Voila! Perfect bridal shower gift!


I have a major scarf addiction! My scarves were ALL over our closet and I could never find them. I saw this great picture on Pinterest and thought I would give it a try. All I got was 2 bathroom towel rods and shower curtain hooks! I just put one scarf in each curtain hook. And holy cow they look great! I can see them all! I think I have a problem... I have 32!
 
 
And last but not least a couple of things I finished up at school! I wanted a new jobs chart. So I created my jobs and printed them out on colorful paper. I think I'm going to love how easy it will be to switch jobs around with these clothespins!
And here is my Math Calendar Board. I am so excited to try this! I bought the beginning pack from Terri Thorton at the Creative Apple. See it here. I think it will be a great addition to my guided math centers.

Thanks for stopping by! So excited to see everyone else's Monday Made Its!


Friday, August 9, 2013

Five for Friday

This is my first time trying out this Five for Friday linky! Yay! Head over to Doodle Bugs to Link up!
1. Today was the first day back to school/work. Boy did my alarm go off early! Yikes!


2. Full day of teacher meetings today! But the good news is we got out early!

3. Still working on Road Trip themed Items for my classroom. Need to get to printing more of these little lovelies since I have more kids coming!
4. I'm so excited that my hubby almost has our deck finished! Only thing left is the stairs! Yay!

5. This weekend is going to be great! Tonight my cousin is in town and we are going to see Footloose. Tomorrow I have a wedding shower for my good friend and then out to eat at my brother's restaurant. Fun!

Have a great weekend!

Monday, August 5, 2013

Monday Made it!

I am linking up with Tara over at Fourth Grade Frolics for this fun linky!


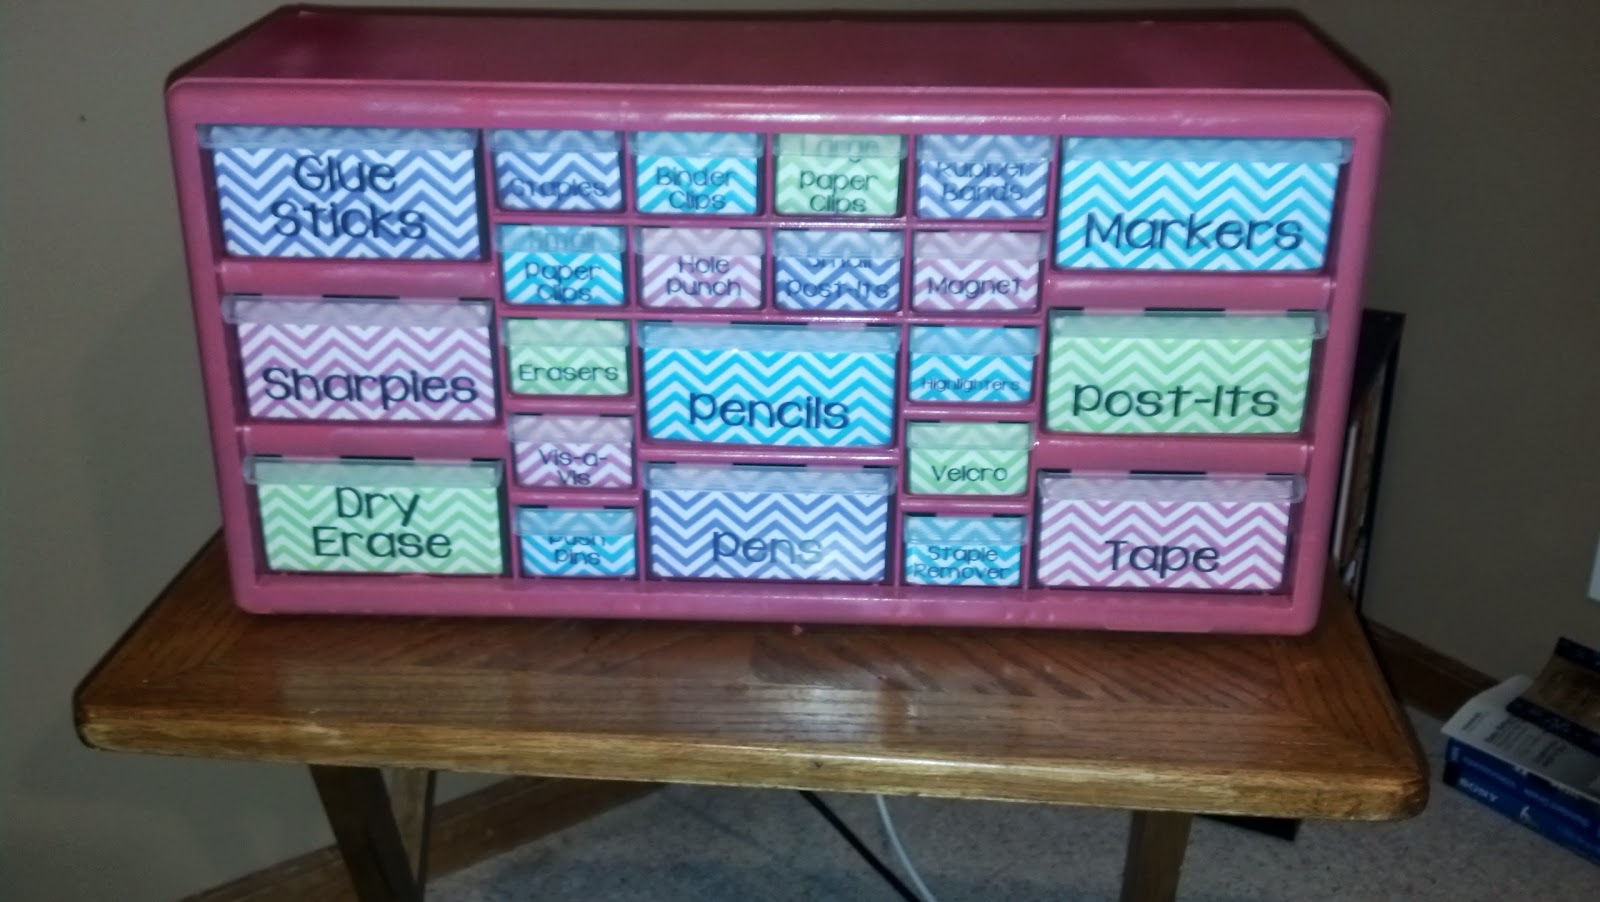
Hello Teacher Toolbox!
So excited about this. Head over to Fun in Room 4B to get the free template!  So easy to make. First, I sprayed painted the ugly gray plastic with bright pink! Then all I did was tweak the labels to fit my needs and printed them out on my cute Chevron paper! And done!
 

The next thing I finished up is something my teammate and I put together last spring for our computer lab! It was so boring before we jazzed it up! My favorite part of it is the GIANT KEYBOARD! AHH!
 I found this great idea for a giant keyboard here.
Here is our finished project! The kids LOVE it! (Almost too much, we had to tell them not to actually punch the keys!)

Here is what we did:
First, we got some take out containers and cut them in half. (Thanks to my brother and our neighborhood restaurant for the donation!) We used about 74 halves. So maybe ask for them to donate about 40 boxes.

Next, we needed to make our letters and numbers. This proved to be the most time-consuming part of the whole thing! So I decided I would put them together in one document for you! Click here to get it from my store! I have a colored version and black and white version. We do not have access to a color printer we used regular construction paper and cut it so it would fit in our copier!

After we printed them out, we cut and laminated them all. See below.

Now we were ready to put it together. We started from with the second row from the bottom because we did not have to cut any of the boxes! After putting up some butcher paper behind, we stapled the "keys" to the wall first. For some boxes we used 1.5 boxes or 2.

 
Then it was time for the fun part! We got some extra sticky glue from our art teacher and began sticking them up! I had to use tape on the corners to keep the paper on until it dried. **Hint. I would suggest laminating the keys that have several pages together, like the space bar, so it is easier to glue to the boxes. (You will see I have a few I need to fix!)
How cute is this!?

SOO I decided to put all of this work into one document for sale on my TPT store! It will be so easy for you to print out and put up! It even has directions!


 I also got started picking out Math Vocabulary for this great word wall! Thanks Run! Ms. Nelson's Got the Camera! See my word wall post here.


AND I saved the best for last!
The last thing I have figured out how to do is throw a Sale at my TPT store! Since its my last few days before I head back to work I figured this is a good way to end my summer! Check out my store for all my fun creations at 15% off! My new Giant Keyboard Project is on sale too!

Thanks for stopping by!


Tuesday, July 30, 2013

Classroom Makeover Day 2!

So I got myself up to school again today and actually spent 4 hours there! I still have some organizing to do but I feel good with where I am at! So I decided to link up with Kimberlee for Teacher Tour Tuesday!
Here are some pictures of it today!
Here is my Homework Club Board! Finally got it hung up! Yay! For the free numbers visit my TPT store!

 This is my library so far. I love my Boggle board for making words!
 
 This is something new I'm going to try this year. This board is right behind my guided reading table. I saw this idea on Pinterest but no one to credit! I made my own labels in my colors and plan to use sticky notes for each guided reading group! I'm hoping it will keep that time more structured! If you want to purchase this set check out my TPT store.

This is outside my door! Thanks to my Cricut it was easy to cut my states! 

View down the middle of my classroom! 
 
I want to use this as a math/reading center tower that I can switch around every 2 weeks. I want to differentiate the activities for my kiddos. Let me know if you have any great ideas!

AND FINALLY! I made a Teacher Toolbox for my desk! Love! I haven't found the perfect spot for it yet but I will.  I bought this lovely at Orscheln's, my husband's favorite store. I spray painted it pink. Thanks to Fun in Room 4B for the free template. I just changed to the words I wanted and printed it on my fun Chevron paper!

Woohoo! I think I am close to being done going in before I have too. Now to enjoy the last few days of summer before we are back next week!

Can't wait to see lots of rooms coming together!